How to Optimise Images for WordPress
Images play a vital role in the design and functionality of a WordPress website, enhancing user engagement and improving readability. However, if not properly optimised, images can negatively impact page speed, SEO rankings, and overall user experience. In this guide, we’ll explore techniques for optimising images in WordPress to ensure your website remains fast and efficient.
Why Image Optimisation Matters
Image optimisation is crucial for several reasons:
- Faster Loading Times: Reducing file sizes helps your pages load more quickly, improving user experience.
- Improved SEO: Google considers page speed a ranking factor, and optimised images contribute to a better score.
- Lower Bandwidth Usage: Smaller image files consume less bandwidth, making them ideal for mobile users.
- Better Performance Scores: Optimising images can improve your site’s performance metrics, such as Core Web Vitals.
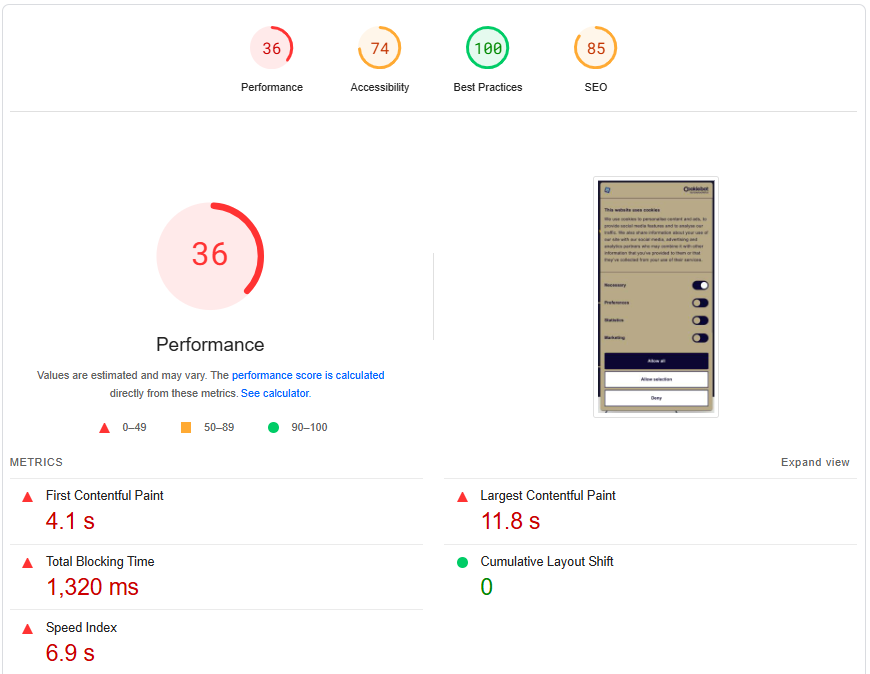
Source: PageSpeed Insights
Best Practices for Image Optimisation in WordPress
Ensure you remember the following when optimising your images:
Use the Right Image Format
Selecting the appropriate file format ensures the best balance between quality and compression:
- JPEG: Best for photographs and images with many colours.
- PNG: Ideal for graphics requiring transparency but tends to have larger file sizes.
- WebP: A modern format that provides high-quality images with smaller file sizes compared to JPEG and PNG.
Compress Images Before Uploading
Compression reduces file size without losing quality. Useful tools include:
- TinyPNG: A simple online compression tool.
- ImageResizer: A versatile tool for resizing and compressing images online.
- Adobe Photoshop: Offers the ‘Save for Web’ feature for optimal web image compression.
Source: TinyPNG
Use WordPress Image Optimisation Plugins
Plugins come with an image optimisation process, making it easier to manage images efficiently. Recommended plugins we use include:
- Smush: Compresses images and supports lazy loading.
- ShortPixel: Optimises images and converts them to WebP format.
- Imagify: Provides different levels of compression and bulk optimisation.
![]()
Source: WordPress
Enable Lazy Loading
Lazy loading ensures images load only when they appear in the user’s viewport, reducing initial page load time. Plugins like Lazy Load by WP Rocket or LiteSpeed Cache offer additional control.
Resize Images Before Uploading
Uploading images at their full resolution is unnecessary and slows down page load speeds. Use tools like Photoshop or Canva to resize images to the exact dimensions required for your website.
Using a Content Delivery Network (CDN)
A CDN helps speed up image delivery by serving files from geographically distributed servers. Popular CDNs include:
- Cloudflare
- KeyCDN
- StackPath
Optimise Alt Text and Metadata
Adding descriptive alt text and optimising metadata improves accessibility and SEO by helping search engines understand your images better.
Regularly Audit Your Media Library
Over time, your media library may accumulate unused images. Use plugins like Media Cleaner or manually remove unnecessary files, keeping your site’s storage optimised.
Monitoring Image Performance
Tracking your site’s image performance is essential for maintaining optimal speed and efficiency. Tools like Google PageSpeed Insights and GTmetrix provide insights into how images affect your site’s load time and offer suggestions for improvement.
By implementing these best practices, you’ll ensure that your WordPress website remains fast, efficient, and SEO-friendly, providing an enhanced user experience for visitors.